Modify your swap space by configuring your Linux machine to use LVM as Swap Space.


Whenever you increase your RAM, computer experts always suggest us to increase the swap accordingly because it is always beneficial to increase your swap space accordingly so that your Linux Machine perform smoothly even for memory-intense(memory consuming) operations and applications which consume more memory.
This is not the only but it is one of the method to modify your swap space in linux.So today in this article we will discuss how to modify your swap space in linux when needed and we will learn how to do that in detail and in few simple steps..
Since we are going to discuss about modification of swap space using lvm here that's why first we will start the procedure by configuring LVM.
If you were new to concept of LVM you can read our articles on LVM because here we will discuss only a brief about the lvm configuration and its integration with swap file.
Since we need to create LVM to complete this article so let's begin with creating partition and configuring lvm.
For extending swap on lvm let me first create lvm.
Step:1 Create partition and set it type to LVM.
[root@localhost ~]# fdisk /dev/hda

The number of cylinders for this disk is set to 9729.
There is nothing wrong with that, but this is larger than 1024,
and could in certain setups cause problems with:
1) software that runs at boot time (e.g., old versions of LILO)
2) booting and partitioning software from other OSs
   (e.g., DOS FDISK, OS/2 FDISK)

Command (m for help): n
First cylinder (9435-9729, default 9435):
Using default value 9435
Last cylinder or +size or +sizeM or +sizeK (9435-9729, default 9729): +100M

Command (m for help): n
First cylinder (9448-9729, default 9448):
Using default value 9448
Last cylinder or +size or +sizeM or +sizeK (9448-9729, default 9729): +100M

Command (m for help): p

Disk /dev/hda: 80.0 GB, 80026361856 bytes
255 heads, 63 sectors/track, 9729 cylinders
Units = cylinders of 16065 * 512 = 8225280 bytes

   Device Boot      Start         End      Blocks   Id  System
/dev/hda1   *           1        2550    20482843+   7  HPFS/NTFS
/dev/hda2            2551        8924    51199155   83  Linux
/dev/hda3            8925        9434     4096575   82  Linux swap / Solaris
/dev/hda4            9435        9729     2369587+   5  Extended
/dev/hda5            9435        9447      104391   83  Linux
/dev/hda6            9448        9460      104391   83  Linux

Command (m for help): t
Partition number (1-6): 6
Hex code (type L to list codes): 8e
Changed system type of partition 6 to 8e (Linux LVM)

Command (m for help): t
Partition number (1-6): 5
Hex code (type L to list codes): 8e
Changed system type of partition 5 to 8e (Linux LVM)

Command (m for help): p

Disk /dev/hda: 80.0 GB, 80026361856 bytes
255 heads, 63 sectors/track, 9729 cylinders
Units = cylinders of 16065 * 512 = 8225280 bytes

   Device Boot      Start         End      Blocks   Id  System
/dev/hda1   *           1        2550    20482843+   7  HPFS/NTFS
/dev/hda2            2551        8924    51199155   83  Linux
/dev/hda3            8925        9434     4096575   82  Linux swap / Solaris
/dev/hda4            9435        9729     2369587+   5  Extended
/dev/hda5            9435        9447      104391   8e  Linux LVM
/dev/hda6            9448        9460      104391   8e  Linux LVM

Command (m for help): w
The partition table has been altered!

Calling ioctl() to re-read partition table.

WARNING: Re-reading the partition table failed with error 16: Device or resource busy.
The kernel still uses the old table.
The new table will be used at the next reboot.
Syncing disks.
Read how to Create Partition in Linux here.
Step:2 Update kernel using partprobe.
After making so much changes in partition table we need to inform kernel about these changes made.For that we use partprobe command.
[root@localhost ~]# partprobe
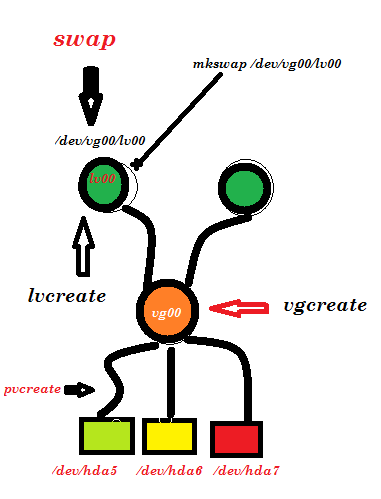
Step:3 Intialize Physical Volumes using "pvcreate" and then Create Volume Groups using "vgcreate".
[root@localhost ~]# pvcreate /dev/hda5 /dev/hda6
  Physical volume "/dev/hda5" successfully created
  Physical volume "/dev/hda6" successfully created


[root@localhost ~]# vgcreate vg00 /dev/hda5 /dev/hda6
  Volume group "vg00" successfully created
Step:4 Configure setting for LVM using command line tool.
[root@localhost ~]# lvcreate -L 200M vg00 -n lv00
  Logical volume "lv00" created
Step:5 Creating a FileSystem on LVM.
[root@localhost ~]# mkfs.ext3 /dev/vg00/lv00
This filesystem will be automatically checked every 32 mounts or
180 days, whichever comes first.  Use tune2fs -c or -i to override.
Step:6 Configure Logical Volume to be used as a Swap Space.
Now we are going to use Logical Volume /dev/vg00/lv00 to be used as swap partition.First thing we do is to format logical volume using mkswap and then activate swap on that partition using swapon command.
[root@localhost ~]# mkswap /dev/vg00/lv00
Setting up swapspace version 1, size = 209711 kB
[root@localhost ~]# swapon -a
Step:7 Make an entry inside /etc/fstab file for Permanent existence.
Permanent mounting is needed to things to be remain as it is even after reboot.I assume that you already know how to mount. I have mentioned permanent mounting in many of my articles.
Learn how to Extend Swap on Logical Volume
1.First thing we have to do is to disable swapping for the associated logical volume:
# swapoff -v /dev/vg00/lv00
2. Then you can resize the logical volume here we resize it by 200MB
# lvresize /dev/vg00/lv00 -L +200M
3.Format the newly created swap space:
# mkswap /dev/vg00/lv00
4.Now Enable the extended logical volume:
# swapon -v /dev/vg00/lv00
#For permanent mounting make an entry to the /etc/fstab file:
# /dev/vg00/lv00 swap swap defaults 0 0
Now it's time to test if the logical volume was successfully extended or not.
 #cat /proc/swaps
 or
#free
Both command will help us to inspect the swap space.
Now how to reduce Swap on an Logical Volume
To reduce an LVM2 swap logical volume
(Here we are assuming /dev/vg00/lv00 is the volume we want to reduce):
To Reduce an LVM2 swap logical volume
1. Disable swapping for the associated logical volume:
# swapoff -v /dev/vg00/lv00
2. Reduce the LVM2 logical volume by 100MB
# lvreduce /dev/vg00/lv00 -L -100M
3. Format the new swap space:
# mkswap /dev/vg00/lv00
4. Enable the extended logical volume:
# swapon -v /dev/vg00/lv00---
Thats all!
Hence we have seen how we can use lvm to increase or decrease swap space according to our need.If we increase our physical RAM we need to increase our swap memory accordingly and for that we need to reduce swap lvm2 space and if we are decreasing our physical RAM for some reason we will need to decrease the swap space accordingly.
You may intrested to Read Article on Advance Guide to LVM.
You may also be intrested in read below articles related to LVM.
How to configure Lvm over Top of Raid(Partitioning RAID Devices)
How to create RAID on Loop Devices and LVM over Top of RAID.
 Sarath Pillai
 Satish Tiwary
Add new comment