How to configure software raid10 in Linux

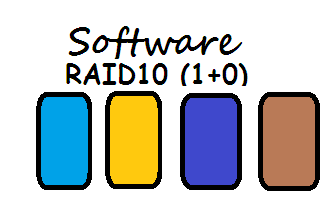
If you are working as a Linux System Administrator or Linux System Engineer or you are already a Storage Engineer or you are planning to start your career in field of Linux or you are preparing for any Linux Certification Exam like RHCE or you are preparing for Linux Admin Interview then the the understanding of Concept of RAID become so important for you along with its configuration.RAID can be configured in LINUX or Windows but here we are explaining RAID configuration on LINUX machines.
Altough we already have explained you about the concept of RAID along with configuration of software RAID0, Configuration of software RAID1 ,Configuration of software RAID5 and software RAID configuration on LOOP Devices.
This time we are going to explain you here about the concept and configuration of software RAID10 step wise in detail.We will learn how to configure software raid, how to examine raid devices, how to see the detail information about raid devices along with active components.We will also learn how to replace and remove faulty devices from software raid and how to add new devices to raid.We will also see the step wise command how to stop and remove raid device by removing raid10 device here.We go the through the process of RAID Recovery and Restoration and learn raid recovery on the command line because it become so important to understand how to recover your data and restore your raid after an unfortunate disk failure.
Let's have a word about RAID10 before it's configuration.
- Minimum number of devices needed to configure software raid10 is 4.
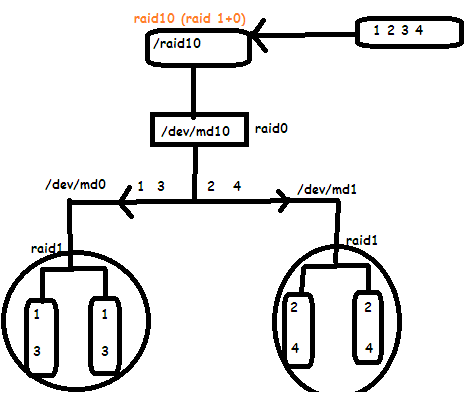
- RAID10 is actually a combination of raid1 and raid0.
- So you can say it has property of both raid1 and raid0. i.e it provides redundancy with performance.
- So here we are using four drives(/dev/sda7 /dev/sda8 /dev/sda9 and /dev/sda10) to create a virtual device called /dev/md10.
- User create and keep it's data on virtual device(/dev/md10) which is actually a raid device which is mounted on /raid10 directory here.
Step1:Create 4 partitions that will be used in raid10 and then update the kernel with this change in partition table using fdisk and partprobe command.
here instead of four different hard disk we are taking four different partitions /dev/sda7 /dev/sda8 /dev/sda9 and /dev/sda10 for just learning the configuration of software raid10. But when you work in real environment you need to take four different hard drive instead of partitions to configure and use software raid10.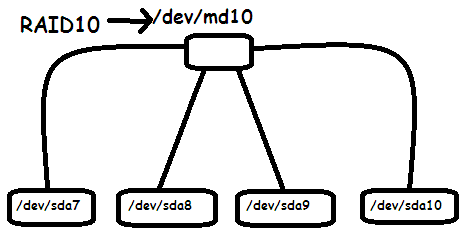
[root@satish ~]# fdisk /dev/sda

The number of cylinders for this disk is set to 4341414.
There is nothing wrong with that, but this is larger than 1024,
and could in certain setups cause problems with:
1) software that runs at boot time (e.g., old versions of LILO)
2) booting and partitioning software from other OSs
   (e.g., DOS FDISK, OS/2 FDISK)

Command (m for help): n
First cylinder (4123129-4341414, default 4123129):
Using default value 4123129
Last cylinder or +size or +sizeM or +sizeK (4123129-4341414, default 4341414): +1G

Command (m for help): n
First cylinder (4150257-4341414, default 4150257):
Using default value 4150257
Last cylinder or +size or +sizeM or +sizeK (4150257-4341414, default 4341414): +1G

Command (m for help): n
First cylinder (4177385-4341414, default 4177385):
Using default value 4177385
Last cylinder or +size or +sizeM or +sizeK (4177385-4341414, default 4341414): +1G

Command (m for help): n
First cylinder (4204513-4341414, default 4204513):
Using default value 4204513
Last cylinder or +size or +sizeM or +sizeK (4204513-4341414, default 4341414): +1G

Command (m for help): w
The partition table has been altered!

Calling ioctl() to re-read partition table.

WARNING: Re-reading the partition table failed with error 16: Device or resource busy.
The kernel still uses the old table.
The new table will be used at the next reboot.
Syncing disks.


[root@satish ~]# partprobe /dev/sda
Step2:Create software RAID Partitions.
Since we are creating these partitions for raid use that's why we need to Change the partition type to raid first before we use it for creating raid10 array.
[root@satish ~]# fdisk /dev/sda

The number of cylinders for this disk is set to 4341414.
There is nothing wrong with that, but this is larger than 1024,
and could in certain setups cause problems with:
1) software that runs at boot time (e.g., old versions of LILO)
2) booting and partitioning software from other OSs
   (e.g., DOS FDISK, OS/2 FDISK)

Command (m for help): t
Partition number (1-10): 7
Hex code (type L to list codes): fd
Changed system type of partition 7 to fd (Linux raid autodetect)

Command (m for help): t
Partition number (1-10): 8
Hex code (type L to list codes): fd
Changed system type of partition 8 to fd (Linux raid autodetect)

Command (m for help): t
Partition number (1-10): 9
Hex code (type L to list codes): fd
Changed system type of partition 9 to fd (Linux raid autodetect)

Command (m for help): t
Partition number (1-10): 10
Hex code (type L to list codes): fd
Changed system type of partition 10 to fd (Linux raid autodetect)

Command (m for help): p

Disk /dev/sda: 160.0 GB, 160041885696 bytes
18 heads, 4 sectors/track, 4341414 cylinders
Units = cylinders of 72 * 512 = 36864 bytes

   Device Boot      Start         End      Blocks   Id  System
/dev/sda1              29      995584    35840000    7  HPFS/NTFS
/dev/sda2   *      995585     3299584    82944000    7  HPFS/NTFS
/dev/sda3         3299585     3697806    14335992   83  Linux
/dev/sda4         3896918     4341414    16001892    5  Extended
/dev/sda5         3896918     4096000     7166986   83  Linux
/dev/sda6         4096001     4123128      976606   83  Linux
/dev/sda7         4123129     4150256      976606   fd  Linux raid autodetect
/dev/sda8         4150257     4177384      976606   fd  Linux raid autodetect
/dev/sda9         4177385     4204512      976606   fd  Linux raid autodetect
/dev/sda10        4204513     4231640      976606   fd  Linux raid autodetect

Command (m for help): w
The partition table has been altered!

Calling ioctl() to re-read partition table.

WARNING: Re-reading the partition table failed with error 16: Device or resource busy.
The kernel still uses the old table.
The new table will be used at the next reboot.
Syncing disks.


[root@satish ~]#partprobe /dev/sda

we may need to reboot the system to save this change in partition table, but if you don't want to rebbot just use partprobe command to update the changes made in partition table.
Step3:Create RAID10 Device using mdadm command.
[root@satish ~]# mdadm --create /dev/md10 --level=10 --raid-devices=4 /dev/sda{7,8,9,10}
mdadm: /dev/sda7 appears to be part of a raid array:
    level=raid1 devices=2 ctime=Tue Mar  4 13:27:18 2014
mdadm: /dev/sda8 appears to be part of a raid array:
    level=raid1 devices=2 ctime=Tue Mar  4 13:27:18 2014
mdadm: /dev/sda9 appears to contain an ext2fs file system
    size=976512K  mtime=Tue Mar  4 13:30:37 2014
mdadm: /dev/sda9 appears to be part of a raid array:
    level=raid1 devices=2 ctime=Tue Mar  4 13:27:18 2014
Continue creating array? y
mdadm: array /dev/md10 started.
[root@satish ~]#
Step4:Reviewing the RAID Configuration.
Review the basic information about all presently active RAID Devices.
[root@satish ~]# cat /proc/mdstat
Personalities : [raid10]
md10 : active raid10 sda10[3] sda9[2] sda8[1] sda7[0]
      1953024 blocks 64K chunks 2 near-copies [4/4] [UUUU]
      [=====>...............]  resync = 25.1% (492288/1953024) finish=20.4min speed=1190K/sec

unused devices: <none>
[root@satish ~]#
You can see in above output the all four drives are sychronizing.The drives are 25% syncronized yet only and after few minutes it will be completely syncronized.
Syncronization time depends on the size of drive and data in the drive.So it will be different for different machine and different drive.
To examine the RAID device in little more Detail use below command.
[root@satish ~]# mdadm --detail /dev/md10
/dev/md10:
        Version : 0.90
  Creation Time : Thu Mar  6 07:04:47 2014
     Raid Level : raid10
     Array Size : 1953024 (1907.57 MiB 1999.90 MB)
  Used Dev Size : 976512 (953.79 MiB 999.95 MB)
   Raid Devices : 4

  Total Devices : 4
Preferred Minor : 10
    Persistence : Superblock is persistent

    Update Time : Thu Mar  6 07:04:47 2014
          State : clean, resyncing
 Active Devices : 4
Working Devices : 4
 Failed Devices : 0
  Spare Devices : 0

         Layout : near=2
     Chunk Size : 64K

 Rebuild Status : 37% complete

           UUID : 8fe469c2:044f4100:d019e4df:69d31e80
         Events : 0.1

    Number   Major   Minor   RaidDevice State
       0       8        7        0      active sync   /dev/sda7
       1       8        8        1      active sync   /dev/sda8
       2       8        9        2      active sync   /dev/sda9
       3       8       10        3      active sync   /dev/sda10
Another alternative method to see information about raid devices.
[root@satish ~]# mdadm --query /dev/md10
/dev/md10: 1907.25MiB raid10 4 devices, 0 spares. Use mdadm --detail for more detail.
/dev/md10: No md super block found, not an md component.
Other Method to get information of any raid devices.
[root@satish ~]# dmesg |grep md10
md10: WARNING: sda8 appears to be on the same physical disk as sda7. True
md10: WARNING: sda9 appears to be on the same physical disk as sda8. True
md10: WARNING: sda10 appears to be on the same physical disk as sda9. True
md: md10: raid array is not clean -- starting background reconstruction
raid10: raid set md10 active with 4 out of 4 devices
md: syncing RAID array md10
md: md10: sync done.
To List Array lines you can use below command:
[root@satish ~]# mdadm --examine --scan
ARRAY /dev/md10 level=raid10 num-devices=4 UUID=8fe469c2:044f4100:d019e4df:69d31e80
If you want to display array lines for a particular device only you can use this command.
here we want to see the details of /dev/md10 array only.
[root@satish ~]# mdadm --detail --brief /dev/md10
ARRAY /dev/md10 level=raid10 num-devices=4 metadata=0.90 UUID=8fe469c2:044f4100:d019e4df:69d31e80
Examine the component of RAID Device.
[root@satish ~]# mdadm --examine /dev/sda7
/dev/sda7:
          Magic : a92b4efc
        Version : 0.90.00
           UUID : 8fe469c2:044f4100:d019e4df:69d31e80
  Creation Time : Thu Mar  6 07:04:47 2014
     Raid Level : raid10
  Used Dev Size : 976512 (953.79 MiB 999.95 MB)
     Array Size : 1953024 (1907.57 MiB 1999.90 MB)
   Raid Devices : 4
  Total Devices : 4
Preferred Minor : 10

    Update Time : Thu Mar  6 07:04:47 2014
          State : active
 Active Devices : 4
Working Devices : 4
 Failed Devices : 0
  Spare Devices : 0
       Checksum : 1d8b870a - correct
         Events : 1

         Layout : near=2
     Chunk Size : 64K

      Number   Major   Minor   RaidDevice State
this     0       8        7        0      active sync   /dev/sda7

   0     0       8        7        0      active sync   /dev/sda7
   1     1       8        8        1      active sync   /dev/sda8
   2     2       8        9        2      active sync   /dev/sda9
   3     3       8       10        3      active sync   /dev/sda10
Step5: Fornmat the Raid Device with the filesystem of your choice.
here we are going to format the Filesystem with ext3 type and mount it using mount it and also complete the process of permanent mounting by making an entry in /etc/fstab file.
[root@satish ~]# mkfs.ext3 /dev/md10
mke2fs 1.39 (29-May-2006)
Filesystem label=
OS type: Linux
Block size=4096 (log=2)
Fragment size=4096 (log=2)
244320 inodes, 488256 blocks
24412 blocks (5.00%) reserved for the super user
First data block=0
Maximum filesystem blocks=503316480
15 block groups
32768 blocks per group, 32768 fragments per group
16288 inodes per group
Superblock backups stored on blocks:
        32768, 98304, 163840, 229376, 294912

Writing inode tables: done
Creating journal (8192 blocks): done
Writing superblocks and filesystem accounting information: done

This filesystem will be automatically checked every 25 mounts or
180 days, whichever comes first.  Use tune2fs -c or -i to override.


Now mount the raid device and then check that it works.

[root@satish ~]# mkdir /raid10

[root@satish ~]# mount /dev/md10 /raid10
Now for permanent Entry go inside /etc/fstab file and type the following at the end of file.
/dev/md10 /raid10 ext3 defaults 0 0
Now it's time to check whether your raid devices is properly mounted or not using df command.
[root@satish ~]# df -h /raid10
Filesystem            Size  Used Avail Use% Mounted on
/dev/md10             1.9G   35M  1.8G   2% /raid10


[root@satish ~]# df -h
Filesystem            Size  Used Avail Use% Mounted on
/dev/sda3              14G  6.3G  6.3G  50% /
/dev/sda5             6.7G  5.6G  757M  89% /var
tmpfs                1010M     0 1010M   0% /dev/shm
/dev/md10             1.9G   35M  1.8G   2% /raid10
Now check raid10 setup after mounting that whether all devices are properly working or not using mdadm command.
[root@satish ~]# cat /proc/mdstat
Personalities : [raid10]
md10 : active raid10 sda10[3] sda9[2] sda8[1] sda7[0]
      1953024 blocks 64K chunks 2 near-copies [4/4] [UUUU]
We can clearly see that raid10 is active it means working properly.
we can also see its components devices /dev/sda7 /dev/sda8 /dev/sda9 and /dev/sda10 all are ok, There is no any faulty device yet here.
For demonstration we are going to Simulate a damaged or lost disk.
REPLACING FAULTY DEVICES FROM RAID.
Note;if you want to replace a faulty device from software RAID device, first you need to make it as faulty device and then you need to remove that faulty device.What i want to say is to fail the device first and then remove it from raid.
Example:For eaxample here we are going to learn how to remove a faulty device say /dev/sda10 here.
step1:To replace faulty device /dev/sda10 first we need to make it faulty device.
[root@satish ~]# mdadm /dev/md10 --fail /dev/sda10
mdadm: set /dev/sda10 faulty in /dev/md10

In case of device failure crashed disk are marked as faulty and reconstruction is started immediately on the spare disk if available.
Now check it whether it becomes faulty device or not using mdadm --detail command.
[root@satish ~]# mdadm --detail /dev/md10
/dev/md10:
        Version : 0.90
  Creation Time : Thu Mar  6 07:04:47 2014
     Raid Level : raid10
     Array Size : 1953024 (1907.57 MiB 1999.90 MB)
  Used Dev Size : 976512 (953.79 MiB 999.95 MB)
   Raid Devices : 4
  Total Devices : 4
Preferred Minor : 10
    Persistence : Superblock is persistent

    Update Time : Thu Mar  6 08:00:31 2014
          State : clean, degraded
 Active Devices : 3
Working Devices : 3
 Failed Devices : 1
  Spare Devices : 0

         Layout : near=2
     Chunk Size : 64K

           UUID : 8fe469c2:044f4100:d019e4df:69d31e80
         Events : 0.4

    Number   Major   Minor   RaidDevice State
       0       8        7        0      active sync   /dev/sda7
       1       8        8        1      active sync   /dev/sda8
       2       8        9        2      active sync   /dev/sda9
       3       0        0        3      removed

       4       8       10        -      faulty spare   /dev/sda10


We can see faulty device still appaer and behave as the member of raid array.This is because the raid array treat the faulty device just as an inactive part of raid array.
- Now we can clearly see that /dev/sda10 is now a faulty device.
- Raid devices is still 4 because the device /dev/sda10 is failed only but not yet removed.
- Total devices is still 4 because failed device is also a device.
- Active devices and working device=3 because now failed device /dev/sda10 is no more available for use.
- Failed Device=1 because we have only failed one device that is /dev/sda10.
step2:Now it's time to remove the faulty device /dev/sda10.
[root@satish ~]# mdadm /dev/md10 --remove /dev/sda10
mdadm: hot removed /dev/sda10
To see removal confirmation use mdadm --detail command again.
[root@satish ~]# mdadm --detail /dev/md10
/dev/md10:
        Version : 0.90
  Creation Time : Thu Mar  6 07:04:47 2014
     Raid Level : raid10
     Array Size : 1953024 (1907.57 MiB 1999.90 MB)
  Used Dev Size : 976512 (953.79 MiB 999.95 MB)
   Raid Devices : 4
  Total Devices : 3
Preferred Minor : 10
    Persistence : Superblock is persistent

    Update Time : Thu Mar  6 08:04:08 2014
          State : clean, degraded
 Active Devices : 3
Working Devices : 3
 Failed Devices : 0
  Spare Devices : 0

         Layout : near=2
     Chunk Size : 64K

           UUID : 8fe469c2:044f4100:d019e4df:69d31e80
         Events : 0.6

    Number   Major   Minor   RaidDevice State
       0       8        7        0      active sync   /dev/sda7
       1       8        8        1      active sync   /dev/sda8
       2       8        9        2      active sync   /dev/sda9
       3       0        0        3      removed
- Here you can see /dev/sda10 is no more.
- Raid devices=4 but total devices=3 because one device is now removed from raid.
- active device=working devices=3 after removing one device /dev/sda10.
[root@satish ~]# cat /proc/mdstat
Personalities : [raid10]
md10 : active raid10 sda9[2] sda8[1] sda7[0]
      1953024 blocks 64K chunks 2 near-copies [4/3] [UUU_]
Above output also clearly show that now only there is 3 device remaining active in raid10.
Adding or Re-Adding of device to existing RAID
RECOVERING and RESTORING a RAID.
For testing purpose we are going to add /dev/sda10 to existing raid /dev/md10.
Add new replacement partition to the RAID.
It will be resynchronized to the original partition.
[root@satish ~]# mdadm /dev/md10 --add /dev/sda10
mdadm: re-added /dev/sda10
Check whether device is added or not.
We can see synchronization started.When the rysync completed your RAID Stored.
[root@satish ~]# cat /proc/mdstat
Personalities : [raid10]
md10 : active raid10 sda10[3] sda9[2] sda8[1] sda7[0]
      1953024 blocks 64K chunks 2 near-copies [4/3] [UUU_]
      [=>...................]  recovery =  9.0% (88384/976512) finish=1.0min speed=14730K/sec
Depending on the size of your Filesystem and bus speed the synchronization could take some time.
You can spare rebuilding option.
[root@satish ~]# mdadm --detail /dev/md10
/dev/md10:
        Version : 0.90
  Creation Time : Thu Mar  6 07:04:47 2014
     Raid Level : raid10
     Array Size : 1953024 (1907.57 MiB 1999.90 MB)
  Used Dev Size : 976512 (953.79 MiB 999.95 MB)
   Raid Devices : 4
  Total Devices : 4
Preferred Minor : 10
    Persistence : Superblock is persistent

    Update Time : Thu Mar  6 08:04:08 2014
          State : clean, degraded, recovering
 Active Devices : 3
Working Devices : 4
 Failed Devices : 0
  Spare Devices : 1

         Layout : near=2
     Chunk Size : 64K

 Rebuild Status : 24% complete

           UUID : 8fe469c2:044f4100:d019e4df:69d31e80
         Events : 0.6

    Number   Major   Minor   RaidDevice State
       0       8        7        0      active sync   /dev/sda7
       1       8        8        1      active sync   /dev/sda8
       2       8        9        2      active sync   /dev/sda9
       3       8       10        3      spare rebuilding   /dev/sda10
How to Stop and Remove RAID.
step1:Remove permanent mounting.Remove or comment the line in /etc/fstab file.
step2:Umount temporary mounting.
[root@satish ~]# umount /raid10

[root@satish ~]# df -h
Filesystem            Size  Used Avail Use% Mounted on
/dev/sda3              14G  6.4G  6.3G  51% /
/dev/sda5             6.7G  5.6G  756M  89% /var
tmpfs                1010M     0 1010M   0% /dev/shm
step3:Stop raid device /dev/md10
[root@satish ~]# mdadm --stop /dev/md10
mdadm: stopped /dev/md10
[root@satish ~]# mdadm --detail /dev/md10
mdadm: md device /dev/md10 does not appear to be active.
step4:remove the raid device.
[root@satish ~]# mdadm --remove /dev/md10
step5:Now remove the partitions used in raid array.
[root@satish ~]# fdisk /dev/sda

The number of cylinders for this disk is set to 4341414.
There is nothing wrong with that, but this is larger than 1024,
and could in certain setups cause problems with:
1) software that runs at boot time (e.g., old versions of LILO)
2) booting and partitioning software from other OSs
   (e.g., DOS FDISK, OS/2 FDISK)

Command (m for help): d
Partition number (1-10): 10

Command (m for help): d
Partition number (1-9): 9

Command (m for help): d
Partition number (1-8): 8

Command (m for help): d
Partition number (1-7): 7

Command (m for help): p

Disk /dev/sda: 160.0 GB, 160041885696 bytes
18 heads, 4 sectors/track, 4341414 cylinders
Units = cylinders of 72 * 512 = 36864 bytes

   Device Boot      Start         End      Blocks   Id  System
/dev/sda1              29      995584    35840000    7  HPFS/NTFS
/dev/sda2   *      995585     3299584    82944000    7  HPFS/NTFS
/dev/sda3         3299585     3697806    14335992   83  Linux
/dev/sda4         3896918     4341414    16001892    5  Extended
/dev/sda5         3896918     4096000     7166986   83  Linux
/dev/sda6         4096001     4123128      976606   83  Linux

Command (m for help): w
The partition table has been altered!

Calling ioctl() to re-read partition table.

WARNING: Re-reading the partition table failed with error 16: Device or resource busy.
The kernel still uses the old table.
The new table will be used at the next reboot.
Syncing disks.
[root@satish ~]# partprobe /dev/sda
Learn alternative method to configure software raid10.
We can configure software raid10 by configuring raid0 over two raid1 device.
Step1:Let's firts create raid1 device /dev/md0 using /dev/sda7 and /dev/sda8 first.
[root@satish ~]# mdadm --create /dev/md0 --level=1 --raid-devices=2 /dev/sda7 /dev/sda8
mdadm: /dev/sda7 appears to contain an ext2fs file system
    size=1953024K  mtime=Thu Mar  6 07:37:59 2014
Continue creating array? y
mdadm: array /dev/md0 started.
You can check your raid status now.
[root@satish ~]# cat /proc/mdstat
Personalities : [raid1]
md0 : active raid1 sda8[1] sda7[0]
      488192 blocks [2/2] [UU]
      [=========>...........]  resync = 47.3% (232384/488192) finish=0.3min speed=13669K/sec

unused devices: <none>
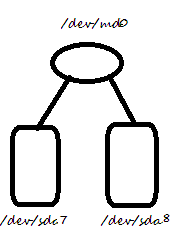
Step2:Now similarly create another raid1 device /dev/md1 using /dev/sda9 and /dev/sda10.
[root@satish ~]# mdadm --create /dev/md1 --level=1 --raid-devices=2 /dev/sda9 /dev/sda10
mdadm: /dev/sda9 appears to contain an ext2fs file system
    size=1953024K  mtime=Thu Mar  6 07:37:59 2014
Continue creating array? y
mdadm: array /dev/md1 started.
Now you can check your raid devices status. You will find now two raid1 devices /dev/md0 and /dev/md1.
[root@satish ~]# cat /proc/mdstat
Personalities : [raid1]
md1 : active raid1 sda10[1] sda9[0]
      488192 blocks [2/2] [UU]
      [==================>..]  resync = 93.0% (455424/488192) finish=0.0min speed=13378K/sec

md0 : active raid1 sda8[1] sda7[0]
      488192 blocks [2/2] [UU]

unused devices: <none>
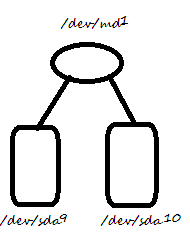
Step3:After creating two raid1 devices(/dev/md0 and /dev/md1) we create raid0 device(/dev/raid10) over these two raid1 device.
[root@satish ~]# mdadm --create /dev/md10 --level=10 --raid-devices=2 /dev/md0 /dev/md1
mdadm: /dev/md0 appears to contain an ext2fs file system
    size=1953024K  mtime=Thu Mar  6 07:37:59 2014
mdadm: /dev/md1 appears to contain an ext2fs file system
    size=1953024K  mtime=Thu Mar  6 07:37:59 2014
Continue creating array? y
mdadm: array /dev/md10 started.
Now you can see your raid device status again you will see 3 raid devices now md0,md1 and md10.
[root@satish ~]# cat /proc/mdstat
Personalities : [raid1] [raid10]
md10 : active raid10 md1[1] md0[0]
      488128 blocks 2 near-copies [2/2] [UU]

md1 : active raid1 sda10[1] sda9[0]
      488192 blocks [2/2] [UU]

md0 : active raid1 sda8[1] sda7[0]
      488192 blocks [2/2] [UU]
Step4:Format the raid device(/dev/md10) and mount it and check it.
[root@satish ~]# mke2fs -j /dev/md10
[root@satish ~]# mount /dev/md10 /raid10
[root@satish ~]# mount /dev/md10 /raid10
[root@satish ~]# df -h
Filesystem            Size  Used Avail Use% Mounted on
/dev/sda3              14G   12G  863M  94% /
/dev/sda5             6.7G  5.6G  756M  89% /var
tmpfs                1010M     0 1010M   0% /dev/shm
/dev/md10             462M   11M  428M   3% /raid10
If you want to make it permanent you can make an entry in /etc/fstab file.
To see list of all raid array present in your system you can use below command.
[root@satish ~]# mdadm --examine --scan
ARRAY /dev/md0 level=raid1 num-devices=2 UUID=228ac221:0ee9f3f1:6df0531f:cbcd2e89
ARRAY /dev/md1 level=raid1 num-devices=2 UUID=d435aa0c:2960073d:23c71e9a:92f0f5ce
ARRAY /dev/md10 level=raid10 num-devices=2 UUID=1d05b7d4:d249f6c8:4de53235:4b786dc7
To see the detail information of your newly created raid10 device you can use below command.
[root@satish ~]# mdadm --detail /dev/md10
/dev/md10:
        Version : 0.90
  Creation Time : Sat Mar  8 08:01:04 2014
     Raid Level : raid10
     Array Size : 488128 (476.77 MiB 499.84 MB)
  Used Dev Size : 488128 (476.77 MiB 499.84 MB)
   Raid Devices : 2
  Total Devices : 2
Preferred Minor : 10
    Persistence : Superblock is persistent

    Update Time : Sat Mar  8 08:07:49 2014
          State : clean
 Active Devices : 2
Working Devices : 2
 Failed Devices : 0
  Spare Devices : 0

         Layout : near=2
     Chunk Size : 64K

           UUID : 1d05b7d4:d249f6c8:4de53235:4b786dc7
         Events : 0.2

    Number   Major   Minor   RaidDevice State
       0       9        0        0      active sync   /dev/md0
       1       9        1        1      active sync   /dev/md1
Any suggestion related to this article is highly appreciated.


 Sarath Pillai
 Satish Tiwary
Comments
RAID
Nice post . thanks for posting
RAID10 Concept and explaination
Very good article..
Wow thank you!
Wow thank you!
raid 10
while creating md10
#mdadm --create /dev/md10 --level=10 --raid-devices=2 /dev/md0 /dev/md1
is the level in this cmd =10 is correct or it should be level 0???
Add new comment